はじめに
こんにちは。SCSKの松谷です。SCSKに新卒で入社し、今年で2年目になります。
本連載では、ローカルLLM実装に向けた検証過程の具体的な作業内容や得られた知見を共有していきます。
第0回で記載したローカルLLM実装の手順は以下の通りでした。
- 1. CUDA Toolkit, NVIDIAドライバのインストール(第1回)
- 2. Dockerのインストール(第2回) ←今回はここ!
- 3. NVIDIA Container Toolkitのインストール(第3回)
- 4. OllamaによるローカルLLMの実行(第4回)
- 5. Ollama + Open WebUIによるローカルLLMの実行(第5回)
第2回の今回は、検証環境の構築作業の一環として、検証機にDockerを導入した際の内容などについて記載しています。
検証機のスペック
| 項目 | 説明 | |
|---|---|---|
| 1 | OS | Rocky Linux 8.10(Green Obsidian) |
| 2 | CPUコア数 | 8 |
| 3 | メモリ容量 | 32GB |
| 4 | ディスク容量 | 300GB |
| 5 | GPU | NVIDIA A100 PCIe 40GB |
Dockerについて
Dockerとはコンテナ技術を利用するためのソフトウェアです。Al検証においてコソテナ技術を利用するメリットには以下のようなものがあります。
1.環境構築の簡素化と高速化
コンテナ技術では、利用したいソフトウェアと必要なライブラリやツールをコンテナイメージとしてパッケージングできます。これにより環境構築の手間が大幅に削減されます。
2.バージョン管理の簡略化
コンテナ技術によって、異なるバージョンのソフトウェアやライブラリを利用できます。例えばソフトウェアAとソフトウェアBで必要なCUDAのバージョンが違っていても、それぞれのコンテナで分離することで、互いに影響を与えることなく動作させることができます。
3.移植性
コンテナイメージには、利用したいソフトウェアと必要なライブラリやツールが含まれています。そのため、どの環境でも同じように動作させることができ、検証環境から本番環境への移行における問題発生を最小限に抑えることができます。
Al検証にあたり、上記のようなメリットを享受するため、検証機にDockerをインストールします。
Dockerのインストール
インストール方法の決定
Docker Engineのインストール方法には以下の3つがあります。
1.Dockerのリポジトリを設定し、そこからインストールおよびアップグレードする
2.RPMパッケージをダウンロードし、手動でインストールおよびアップグレードする
3.自動化スクリプトを使用してインストールする
公式から推奨されているのは、「Dockerのリポジトリを設定し、そこからインストールおよびアップグレードする」方法なので、今回はこちらの方法でインストールを行います。
インストール手順の確認
インストール方法が決定したので、公式のドキュメントでインストール手順を確認します。
[Docker Engine]タブ→ [Install]タブとクリックすると、サポートされているディストリビュージョンごとのタブが現れます。
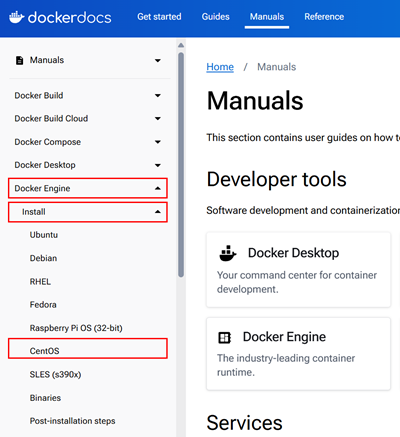
検証機のOSであるRockyLinuxのタブはありませんが、RockyLinuxはCentOS互換なので、今回はCentOSでのインストール手順を参照します。
インストール作業
以下のような手順で、Docker Engineをインストールしていきます。
リポジトリの設定
  [root@aitest ~]# yum install yum-utils
  [root@aitest ~]# yum-config-manager --add-repo
  https://download.docker.com/linux/centos/docker-ce.repo
Docker Engineのインストール
  [root@aitest ~]# yum install docker-ce docker-ce-cli containerd.io docker-buildx-plugin
  docker-compose-plugin
Dockerの起動
[root@aitest ~]# systemctl start dockerインストールが正常に完了したかの確認
  [root@aitest ~]# docker container run hello-world
  Unable to find image 'hello-world:latest' locally
  latest: Pulling from library/hello-world
  clec31eb5944: Pull complete
  Digest: sha256:94323f3e5e09a8b9515d74337010375a456c909543elff1538f5116d38ab3989
  Status: Downloaded newer image for hello-world: latest

  Hello from Docker!
  This message shows that your installation appears to be working correctly.

  To generate this message, Docker took the following steps:
    1. The Docker client contacted the Docker daemon.
    2. The Docker daemon pulled the "hello-world" image from the Docker Hub.
    (amd64)
    3. The Docker daemon created a new container from that image which runs the
    executable that produces the output you are currently reading.
    4. The Docker daemon streamed that output to the Docker client, which sent it
    to your terminal.

  To try something more ambitious, you can run an Ubuntu container with:
   $ docker run -it ubuntu bash

  Share images, automate workflows, and more with a free Docker ID:
   https://hub.docker.com/

  For more examples and ideas, visit:
   https://docs.docker.com/get-started/
「Thismessage shows that your installation appears to be working correctly.」と表示されたので、無事にDockerのインストールをすることができました。
インストール後の設定
Dockerがシステム起動時に自動的に開始するように設定
  [root@aitest ~]# systemctl enable docker.service
  [root@aitest ~]# systemctl enable containerd.service
Dockerを非rootユーザーでも実行できるように設定します。
「docker」というグループが作成されているか確認(なければ groupadd docker で作成してください。)
  [root@aitest ~]# grep docker /etc/group
  docker:x:969:
Dockerを利用できるようにしたいユーザーを「docker」グループに追加(今回はユーザー「matsutani」を追加)
[root@aitest ~]# usermod -aG docker matsutani「docker」グループに追加したユーザー「matsutani」でdockerが利用できるか確認
  [matsutani@aitest ~]$ docker container run hello-world

  Hello from Docker!
  This message shows that your installation appears to be working correctly.

  To generate this message, Docker took the following steps:
    1. The Docker client contacted the Docker daemon.
    2. The Docker daemon pulled the "hello-world" image from the Docker Hub.
    (amd64)
    3. The Docker daemon created a new container from that image which runs the
    executable that produces the output you are currently reading.
    4. The Docker daemon streamed that output to the Docker client, which sent it
    to your terminal.

  To try something more ambitious, you can run an Ubuntu container with:
   $ docker run -it ubuntu bash

  Share images, automate workflows, and more with a free Docker ID:
   https://hub.docker.com/

  For more examples and ideas, visit:
   https://docs.docker.com/get-started/
これで無事にDockerをインストール、セットアップが完了しました!
おわりに
今回は、第2回として「Dockerのインストール」に焦点を当て、紹介しました。
Dockerをインストールする際の手助けになれば幸いです。
次回は、検証環境の構築作業として「NVIDIA Container Toolkitのインストール」をテーマに記載していきます。お楽しみに!
次回(第3回)のコラムはこちら
著者プロフィール

松谷 康平(まつたに こうへい)
SCSK株式会社 インフラエンジニア
2023年に新卒で入社。現在はお客様のインフラ環境の構築を担当。
所属組織では、AI検証活動を積極的に行っている。
お問い合わせ・資料DL
NVIDIAソリューションに関するご相談や、各種資料ダウンロードはこちらから
